
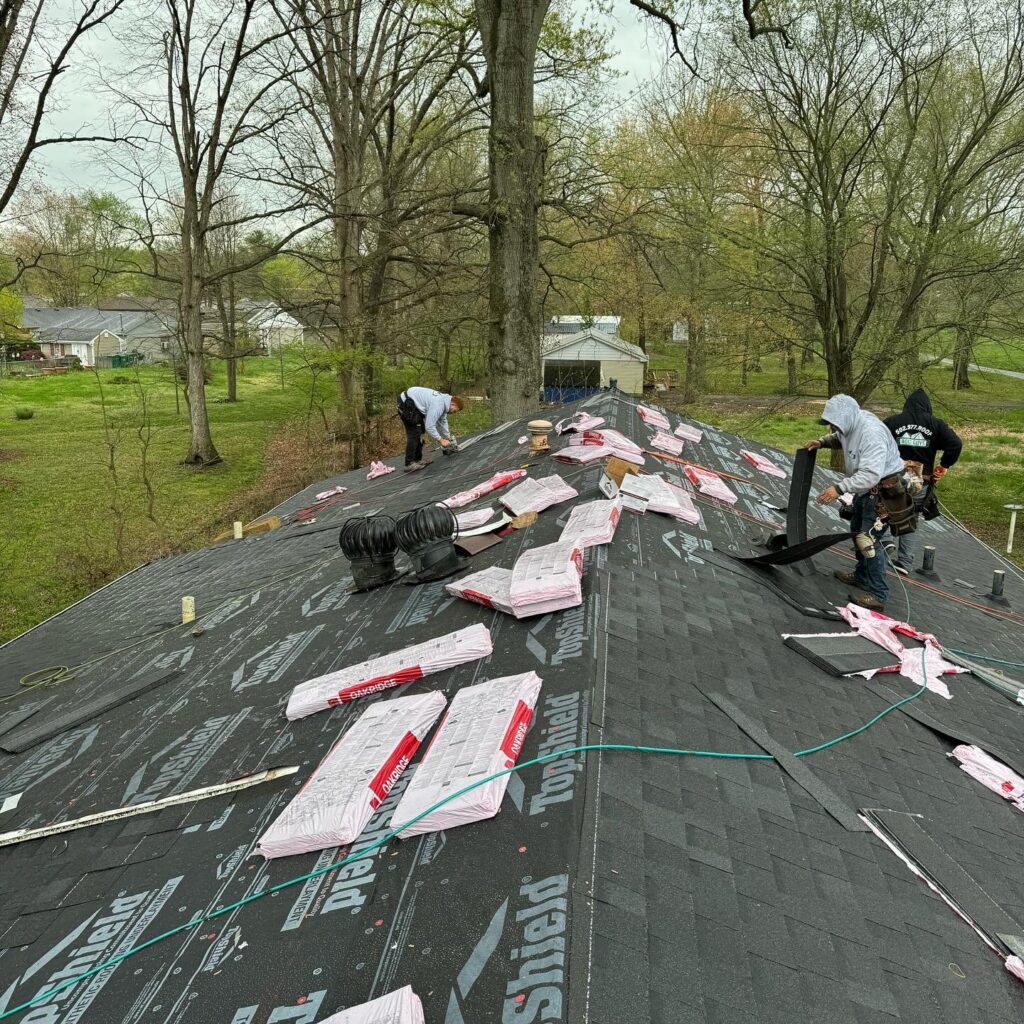
Do you think that your roof is completely waterproof? Many homeowners in Kentucky believe that, too. But what you see on the outside is only half the story. The actual defense against leaks happens in the underlying layers that people don’t invest in until it’s too late.
In this post, we’ll show you where ice and water shield goes on a roof and how to install ice and water shield the right way, so your roof is ready before the next Louisville freeze.
An ice and water shield stands between your roof and a four-figure repair nightmare bill. At Roof Guys, we have seen homeowners save thousands of dollars when weather elements put their roofing to the test.
So what makes an ice and water shield so effective for roofing? This blog post will answer the most common questions.
How Does an Ice and Water Shield Work?
An ice and water shield is a peel-and-stick membrane made of polymer-modified bitumen or rubberized asphalt. In plain words, it is a thick, sticky, rubber-like sheet that bonds to the wood of your roof. Its purpose is quite simple! It forms a waterproof barrier against leaks seeping into your roof deck, even if the roof above is damaged, lifted, or compromised.
This shield sticks directly to the roof decking and forms a tight seal. It also boasts a self-repairing property around nail holes or fasteners. It really earns its keep in high-risk zones where precipitation tends to pool up, including roof valleys, eaves, skylights, and chimneys.
Unlike the popular felt paper (the older, paper-like layer under shingles) that just delays moisture, an ice and water shield is fully waterproof. It’s flexible and tough enough to handle dramatic temperature changes. That makes it ideal for Kentucky’s climate, where you might be dealing with snow today, storms tomorrow, and who knows what next week.
There are a few types of ice and water shield, from standard granular-surface rolls to high-temperature versions made for metal roofs.
Where Does Ice and Water Shield Go on a Roof?
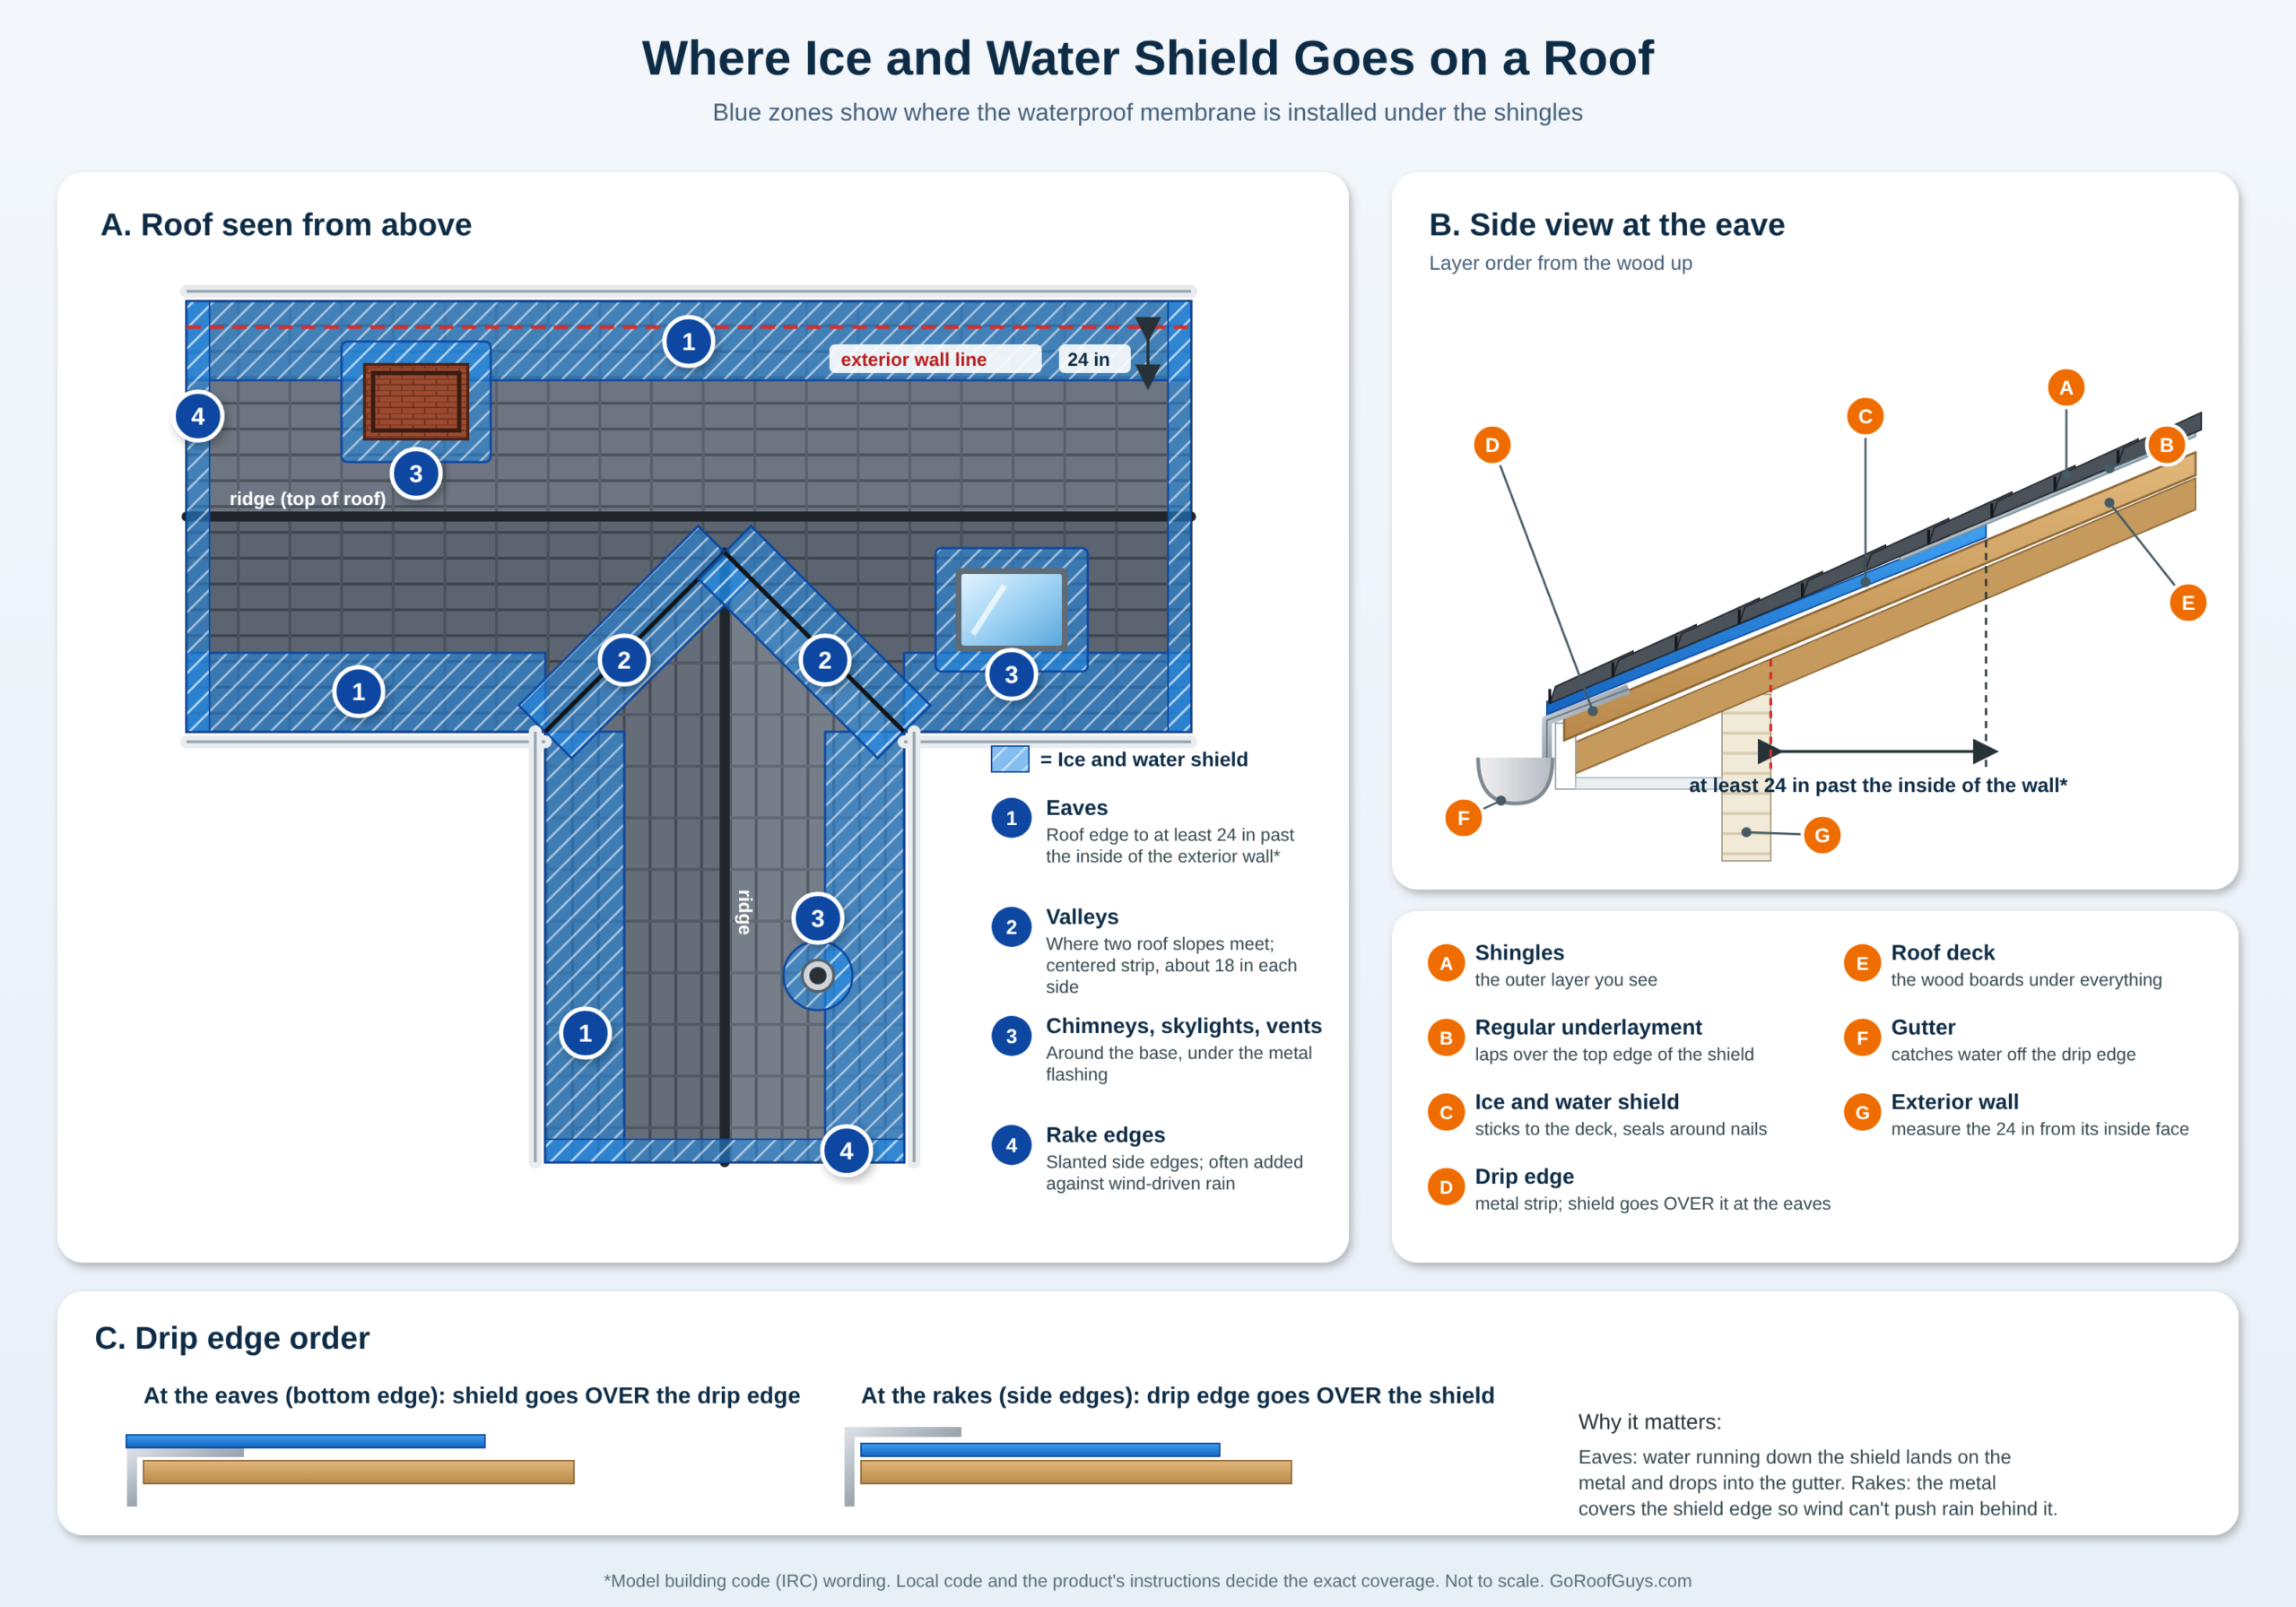
Ice and water shield goes where water is most likely to sneak under your shingles. It does not usually cover the whole roof. The diagram below shows the main spots.
| Roof area | What it is | Why it needs ice and water shield | Typical coverage |
|---|---|---|---|
| Eaves | The bottom edge of the roof, where the gutters hang | Ice dams form here and push water back up under the shingles | From the roof edge to at least 24 inches past the inside of the exterior wall |
| Valleys | The V-shaped channel where two roof slopes meet | Water from two slopes rushes through one narrow path | A full-width strip centered in the valley, about 18 inches on each side |
| Chimneys, skylights and vent pipes | Anything that pokes through the roof | Shingles cannot overlap fully around them, so gaps form | Around the base, under the flashing (the thin metal pieces that seal these joints) |
| Rake edges | The slanted side edges of a gable roof | Wind can drive rain sideways under the edge shingles | Often added along the full edge |
| Low-slope sections | Parts of the roof that are close to flat | Water drains slowly and snow sits longer | Often the whole section |
What does the building code say?
The International Residential Code (IRC), the model code most U.S. cities build their local rules from, calls for an ice barrier at the eaves in areas where ice has a history of forming along the roof edge. It says the barrier should run from the lowest roof edge to at least 24 inches inside the exterior wall line, and many building departments measure that from the inside face of the wall. Your city decides which version of the code applies and whether your area counts as an ice-risk area. Louisville winters are milder than in northern cities, so ask your roofer which local rules they follow, or check with Louisville Metro. Many roofers here still install it at the eaves and valleys because of freeze-thaw ice dams.
Example: Say your roof hangs 12 inches past your outside wall, and the wall is about 6 inches thick. The shield has to cover the 12-inch overhang, the 6-inch wall, and 24 more inches inside the wall. That’s about 42 inches measured flat (straight across, not along the roof). Because the roof slopes, the distance along the roof is longer. On a common 6/12 roof (one that rises 6 inches for every 12 inches across), it works out to about 47 inches. A standard roll is about 36 inches wide, so most homes need two rows at the eaves, with the upper row overlapping the lower one.
The Right Way to Install Ice and Water Shield for Roofing
Installing an ice and water shield for roofing might sound simple, but it’s a detail-driven and precision-demanding process. The whole point is creating a watertight barrier, so every seam, overlap, and corner has to be perfect.
Here is the order most jobs follow:
- Prepare the roof deck.
- Put the drip edge on at the eaves.
- Line the valleys first.
- Run the eave strips, starting at the lowest edge.
- Cover chimneys, skylights and vents.
- Add the rake edge drip edge on top of the shield.
- Cover the rest of the roof with regular underlayment, then shingles.
➔ Preparation
The roof deck must be completely clean, dry, and free from debris. Even a thin layer of dust can affect the adherence of the shield.
Then, measure and mark the key zones that are mostly vulnerable to water intrusion. These include the eaves, valleys, rake edges, and areas around chimneys, vents, and skylights.
A few more things to check before the first roll goes down:
- Temperature: Most products need the air and the roof deck to be about 40°F or warmer, or the membrane won’t stick well.
- Soft or rotted wood: Replace it first. The shield can only seal to a solid deck.
- Old roofing: On a reroof, the old shingles and underlayment come off down to the bare deck.
Drip Edge Order: Eaves vs Rakes
The drip edge is the metal strip along the edge of your roof that guides water into the gutter and away from the wood. The order of the drip edge and the shield is different at the bottom edge and the side edges.
| Roof edge | What goes on first | What goes on top | Why |
|---|---|---|---|
| Eaves (bottom edge) | Drip edge | Ice and water shield | Water running down the shield lands on the metal and drops into the gutter |
| Rakes (side edges) | Ice and water shield | Drip edge | The metal covers the shield edge, so wind-driven rain can’t get behind it |
This is the method in major manufacturer instructions, such as Owens Corning’s. Some local codes or products allow a different order, so the product’s own instructions always win. If you want to compare edge styles, here’s how to pick the right drip edge for your roof.
➔ Installation
Next up, the installation begins at the eaves, right after any valley pieces are in place. The membrane gets unrolled first with its backing peeled away, then it’s firmly pressed into place. Each section overlaps the previous one by several inches for a watertight seal.
How much overlap? Common manufacturer numbers look like this:
| Overlap | Typical minimum |
|---|---|
| Side lap (where one row sits over the row below) | About 3 to 3.5 inches |
| End lap (where two rolls meet end to end) | 6 inches |
Additional layers often go around roof penetrations or in valleys for extra durability. Once the shield is in place, shingles or tiles go over it.
The rest of the roof gets a regular synthetic underlayment. It overlaps the top edge of the shield, the way shingles overlap each other, so water always runs over a seam and never into it. Underlayment should never go underneath the shield.
Professional roof installers watch the weather closely. Most products need about 40°F or warmer to stick properly, so in a cold snap, crews may wait for a warmer day or keep the rolls indoors until they go on the roof. Once the membrane grabs, a wrinkle is very hard to fix, so the crew lays each piece flat before pressing it down.
In colder regions, contractors often extend the ice and water shield at least 24 inches past the inside of the exterior wall. This provides extra coverage where melting snow and refreezing ice leak the most.
Nails, Staples and Rain
- Nails, not staples. The manufacturer instructions we checked call for roofing nails where fasteners are needed, usually placed where the next row covers them. Staples are not part of those instructions.
- Rain after install is fine. Once the shield is stuck down, it is waterproof. The problem is rain before install, because the deck has to be dry.
- Don’t leave it uncovered too long. Sunlight breaks the membrane down over time. Limits vary by product, from about 30 days for some standard rolls to about 120 days for some high-temperature rolls.
Can You Install Ice and Water Shield Yourself?
You can install it yourself if you are familiar with roofing tools and techniques. Some experienced DIY homeowners attempt it too.
Just know that a single wrinkle, air bubble, or poorly aligned seam can compromise the entire waterproof barrier. Roofing professionals utilize specialized tools and techniques to ensure seamless adhesion, proper overlap, and complete coverage in high-risk areas.
They can also inspect for hidden deck damage before applying the membrane. DIY often misses this step, but it can make a huge difference when leaks show up down the line.
If your roof has multiple pitches, valleys, or existing damage, calling certified experts like Go Roof Guys is the safer bet.
Hiring someone? Ask these questions before you sign:
- How far up from the eaves will the shield go on my roof?
- Will you line the valleys and the areas around my chimney and skylights?
- Does the drip edge go under the shield at the eaves and over it at the rakes?
- Which brand are you using, and will you follow its instructions?
- What will you do if you find soft or rotted decking?
Should You Put Ice and Water Shield on the Entire Roof?
Usually, no. Most roofs only need it in the high-risk areas shown above.
Here’s why:
- It can trap moisture: Ice and water shield lets almost no water vapor pass through it. Your attic still gives off moisture in winter. If the whole deck is sealed and the attic doesn’t breathe well, that moisture can collect under the roof.
- It costs more: It is pricier than synthetic underlayment, which works well on the open parts of the roof.
When full coverage can make sense:
- Low-slope roofs, like a porch or a back addition
- Homes with repeat ice dam leaks
- Some metal roofs, when the metal roofing maker asks for it
Manufacturers say full coverage needs proper attic ventilation. If someone suggests covering your whole roof, ask how they plan to vent the attic.
High-Temp Ice and Water Shield for Metal Roofs
Thin metal panels pass the sun’s heat straight down to the layer underneath. On a hot day, that layer can get hotter than standard ice and water shield is made for, and it can soften or stick to the metal. A high-temperature (high-temp) version is made to handle that heat.
| Standard ice and water shield | High-temp ice and water shield | |
|---|---|---|
| Best for | Asphalt shingle roofs | Metal roofs and other hot roofs |
| Heat rating | Lower | Higher (some rated up to about 260°F) |
| Typical price | Lower | Higher |
If you are thinking about a metal roof, ask your roofer whether they use a high-temp membrane and whether the metal roofing manufacturer requires one.
Is Your Roof Ready to Handle Ice Dams This Winter?
Among all the things that can damage your roof, ice dams top the list.
They form when snow melts on the warmer upper section of your roof, flows down, and refreezes at the eaves. Over time, that ice buildup traps water behind it.
With nowhere else to go, the water eventually starts to leak into your attic or ceiling. The trapped moisture soaks your insulation and stains your ceilings. It can even trigger wood rot or mold growth.
An ice and water shield prevents that by forming a watertight barrier beneath your shingles, blocking backed-up water from getting inside. So even if an ice dam forms, the water that backs up under the shingles hits a sealed layer instead of bare wood.
An Insurance industry insights report states that ice dams cause hundreds of millions of dollars in property damage across the U.S. each year. Most of these cases can be easily prevented with an adequate roof barrier in place.
If ice is already building up along your gutters, safe ice dam removal comes first. The shield is what keeps the next one from turning into a leak.
How Does Ice and Water Shield Prevent Leaks Before They Start?
The ice and water shield may look thin, but it punches way above its weight. Once it bonds to the roof deck, it functions as a waterproof membrane that stops leaks before they even start.
When a nail punctures this barrier, the rubberized asphalt material flexes and self-seals around it. This way, every nail becomes watertight. That’s something traditional underlayment simply can’t do.
This flexibility also allows the shield to move with your roof as temperatures swing throughout the year. When the wood beneath expands or contracts, the shield stretches along to maintain a tight seal through every freeze-thaw cycle.
Ice and Water Shield for Louisville Homes
Louisville winters don’t always bring deep snow. The city averages about 13 inches a year. What they bring is a lot of freezing and thawing. In January, days average in the low 40s and nights drop below freezing. Snow melts on a sunny afternoon, then refreezes at the gutters overnight. That back-and-forth is exactly what creates ice dams and the leaks that follow.
Homes around Louisville that need ice and water shield the most:
- Homes with a history of ice along the gutters. If you’ve seen icicles or a ridge of ice at the roof edge before, it will likely happen again.
- Roofs with valleys, dormers or skylights. Every valley and opening is a spot where water can get in.
- Low-slope porch roofs and additions. Water drains slowly, so even a small ice dam backs up fast.
- Older roofs. Some older roofs were installed without any ice and water shield at the eaves. Only a look under the shingles at the edge can confirm what you have.
- Homes with ceiling stains near outside walls. A brown stain along the top of an outside wall after a thaw is a classic ice dam sign.
Can you add ice and water shield to an existing roof?
Not without lifting the shingles. The shield sticks directly to the roof deck, so it goes in during a roof replacement or when a section of the roof is redone. If your roof is getting close to replacement, plan for it now rather than after a leak.
Free pre-winter roof check: Our team checks Louisville homes before the cold sets in. We’ll look at:
- Your eaves and gutters for signs of past ice dams
- Your valleys, chimney and skylight seals
- Your attic for water stains, damp insulation or poor airflow
- Whether your roof already has an ice and water shield at the edges
We serve Louisville and nearby areas, along with Cincinnati.
Is It Time to Schedule an Ice and Water Shield Inspection?
While an ice and water shield for roofing is designed to go the distance, it’s not invincible. Age wears it down, sloppy installation can doom it from the start, and Kentucky’s severe weather takes its toll over the years.
Listed below are the five clear warning signs that your shield is past its prime:
- Water stains or leaks inside your attic or ceilings
- Lifting or curling shingles along the roof edges or valleys
- Frequent ice dams or leaks during snow melts
- Soft decking or sagging near eaves
- Visible cracks, bubbles, or peeling in the membrane during roof repairs
Once your roof crosses the 15-year threshold, or if you have been fighting the same leak problems season after season, schedule a roof inspection. It’s always better to catch issues early than deal with major damage later.
FAQs About Ice and Water Shield
Do you nail or staple ice and water shield?
Use roofing nails, not staples, and only where the product instructions allow. Where nails are needed, they usually go near the top edge, where the next row covers them. The shield seals itself around each nail.
Should ice and water shield go over or under the drip edge?
At the eaves, it goes over the drip edge. At the rake edges, it goes under the drip edge. Always follow the specific product’s instructions.
Does ice and water shield go over or under the gutter apron?
Over it. A gutter apron is a type of drip edge at the eaves that tucks down into the gutter. The shield laps over it so water runs off the shield, onto the metal and into the gutter.
Do you put underlayment on top of ice and water shield?
Regular underlayment overlaps the top edge of the shield where the two meet. It does not go underneath the shield.
Can ice and water shield get rained on?
Yes, once it is installed. It is waterproof. The roof deck must be dry when the shield goes down, and the shield should be covered with shingles within the time the manufacturer allows.
Can you add ice and water shield without replacing the roof?
Only by removing the shingles in that area. Most homeowners add it during a roof replacement.
Final Thoughts
If you are unsure whether your roof has an ice and water shield or think yours may be damaged, we can help. At Roof Guys, we specialize in high-performance roofing systems designed to protect your home from the elements year-round.
Call us today at 502-977-7663 to schedule a service, or request your free quote online at GoRoofGuys.com. Ask about a free pre-winter roof check, so you know where you stand before the first hard freeze.